Branches Drawing Ideas
While going out into nature, seeing a few wonderful trees is consistently perfect. Whether they are loaded up with leaves or exposed in the Cold weather months, they carry excellence to any scene they’re in. Their complicated branch designs can make it very challenging to figure out how to draw branches yourself, notwithstanding.
Visit the Children coloring pages for kids’ education.
In the event that you might want to make your very own portion practical branches, this is the most ideal aide for you! When you arrive at the finish of this instructional exercise, you ought to have no issue drawing a few mind boggling branches. Our bit by bit guide on the most proficient method to draw branches will show you how simple it tends to be the point at which you know what to do!
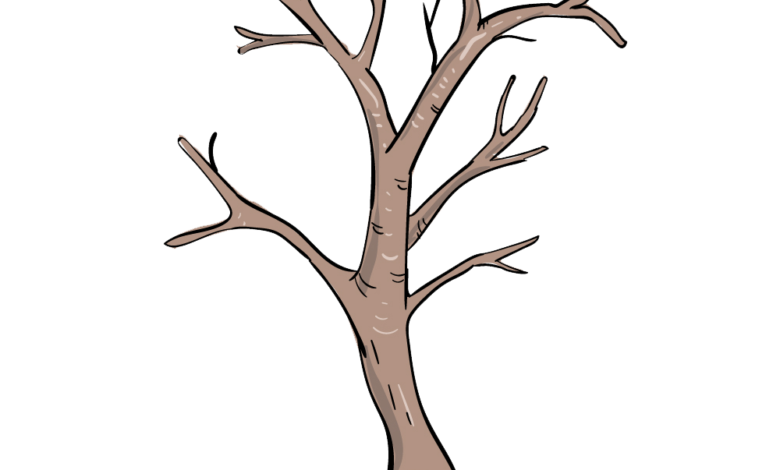
Stage 1 – drawing branches
To get this aide on the most proficient method to draw branches going, we will be beginning with one side of the tree alongside one slender branch as an afterthought. To do this, you can define a marginally bended vertical boundary for the side of the tree. You shouldn’t stress a lot over utilizing a smooth line, as a marginally more unpleasant line will assist with giving the presence of bark. Simply make certain to leave a little space in the line, as we will add a branch there. This branch will be extremely slim and calculating vertical marginally. You can likewise make certain to add a fork toward its finish, as displayed in the reference picture. When you’re content with what it looks like, we’re on to stage 2!Stage 2 – Continue to add more branches in this step
You will utilize the technique with which you drew the primary branch for the following couple of you will attract this aide. These next ones will have varieties, yet the general construction is something very similar. You can include a huge branch the left-hand side that likewise has a fork in it, with the exception of this fork will be a lot bigger than the principal branch. Then, you can draw the left-hand side as well as the rest of the foundation of the tree. At long last for this piece of your branches drawing, you can draw a three-pronged branch close to the upper right-hand side.
Stage 3 – Presently, continue to broaden the tree up
We will keep broadening the tree up in this subsequent stage of our aide on the most proficient method to draw branches. To do this, you can expand a long branch going up toward the right. This branch will fork toward the end, with the branches parting into two headings. Every one of these branches will likewise have their own forked closures. It might sound confounded yet the reference picture will make it understood!Stage 4 – Finish the last part of the tree
The last branch that we will add your branches drawing will go on the upper left-hand side of the tree. It will be a seriously lengthy branch with a few more modest ones falling off of it, and likewise with different ones every one of these more modest branches will likewise have branches falling off of them.That will polish off the construction of your branches drawing, so presently you can continue on toward the last subtleties!
Stage 5 – Presently, you can add the last subtleties to your branches drawing
We will add some last contacts and subtleties prior to shading in for this step of our aide on the most proficient method to draw branches. The subtleties that we have added are very basic, however they will have a major effect in truly polishing off your drawing!
A large portion of these subtleties are drawn for certain minuscule lines, with some being vertical and others going at the curves of the branches. You can likewise draw on a few exceptionally slight twigs falling off of the tree.
These are the subtleties that we would add, however you ought to go ahead and add any subtleties of your own that you would like! One incredible method for putting your own twist on the attracting could be to draw a cool foundation for it. Perhaps it’s essential for a dull, creepy woodland with an owl roosted on it or it could have a bed of fall leaves under it. There are a lot of ways that you can get innovative with it, and we can hardly stand by to see what you think of!
Stage 6 – Polish off your branches drawing with some tone
Now that your branches drawing is finished, now is the right time to polish it off for certain unbelievable varieties! For our model, we went with a basic yet powerful earthy colored variety plot, however there are so many alternate ways that you could carry different tones into the situation.
In the event that you attracted a foundation the past step, shading that in is an extraordinary method for adding whatever other varieties that you might want to incorporate. For instance, on the off chance that you drew a few leaves under the tree, you could work in colors like green, brown, yellow and orange for certain sprinkles of variety.
Then, when you realize which colors you might want to utilize you can have a good time picking some extraordinary workmanship mediums to rejuvenate the varieties! For pictures managing nature, it tends to be perfect to utilize watercolor paints or shaded pencils for a gentler look.
Also Read USA fulnews